The task cards that you will find on this website were created by Cindy Loop Snyder, Elizabeth Pearsall, and Janet Molzan. You are welcome to use, copy, and adapt these activities for classroom use. Please include credit to Cindy Loop Snyder, Elizabeth Pearsall, and Janet Molzan if you choose to use and share them.
Making Coding Mats, Paths, Grids, and Mazes
During the past 18 months we have been trying out different mats, grids, and mazes for our students to run their robots (BlueBot, DASH, and MBot). Here are some of the options we have used and rejected and our final solutions.
We use Solo cups, large and small (shot glass size) to make pathways and mazes. They are easy to use for all ages and can be easily adjusted. Storage is quick and easy. The only difficulty we have found is that once taken apart and redone any coding needs debugging if the exact measurements for lengths and angles are not duplicated.
We use masking tape on our classroom and hallway floors to make paths. Again, they are easy to use. At first students tend to make them very complicated with lots of different size angles but after trying to “drive” the robot or code the robot through them the students understand the capabilities of the robot better and they make more reasonable paths or mazes. Cleanup is easy – just pull the tape up from the floor.
These two options are great and we highly recommend them. We also looked at the problem of how to build a path or maze that could be reconstructed again.
For paths and mazes that can be taken down and then put up again here is what we tried…
The first straight wall mazes were built with leftover cardboard from boxes. The height was 30 cm (12 inches) and bent every 30 cm if the piece was longer or joined with book-binding tape. This did give us the flexibility of different angles depending on how the cardboard was bent. However, the cardboard had a tendency to shift and a 45 ⁰ angle for one coding run often wasn’t 45 ⁰ the next run. Other problems were the cardboard would tip over easily. If we shored it up with cardboard cross pieces, those pieces jutted into the pathway and were difficult to move around. There were times when I questioned the effectiveness of the Bluetooth signal getting through to the middle of the maze but lack the deep understanding and knowledge of “Bluetoothing” to have proof. Cutting down the height of the maze walls to 15 cm seemed to help. In the end the two biggest problems of where and how to store all these maze wall parts and the fact that it was difficult for our younger students to set up and see the whole maze made us move on and try something else.
The next maze walls we tried were using foam core. A local dollar store had pieces the size of letter paper (9’ X 12”) and could be scored and snapped into pieces. The height was 5 cm and to make the cross walls, pieces were notched out. However this notching weakened the foam core pieces and when our students tried to build the maze the pieces broke apart at the notch.
So … here is what we now use successfully for mazes and grids!
We purchased PVC door jamb pieces. They are 7 feet long and cost around $7 (Canadian).
Since the piece is PVC there are no splinters and the cuts ends are smooth making it easy to lay them down one after another. Several pieces were cut at 45⁰ angles to make easy maze corners. The length for all pieces was 10 cm. Although this length was not suitable for our Bluebots who move 15 cm at a command it worked great with the DASH and Mbots. Also for students who created a maze on Scratch and then duplicated it to run robots, the standard unit of length made calculations and creations easy.
A trip to the local fabric store netted us several pieces of coloured vinyl. We made grids using masking tape or permanent markers. In one cases the students drew & coloured their story map locations right on the light grey vinyl. Vinyl that was lightweight was easy to move and store but wrinkled easily and once wrinkled made it difficult for the robots to move easily around. Heavy weight vinyl was difficult to roll up and store. Drawing smeared if we used anything but permanent markers.
So … here is what we now use successfully for mazes and grids!
We use clear vinyl. We use it mostly for our BlueBots. The size of the vinyl mat is small enough (150 cm X 150 cm) to make it easy to move and store. The weight is a medium gage so that it doesn’t wrinkle and when folded over does not leave fold marks. Permanent markers make grid marks every 15 cm. It is light enough for our students to lift up and add pictures underneath. It is sturdy enough to have a ceramic tile on a grid space as part of the challenge for BlueBot to go around.
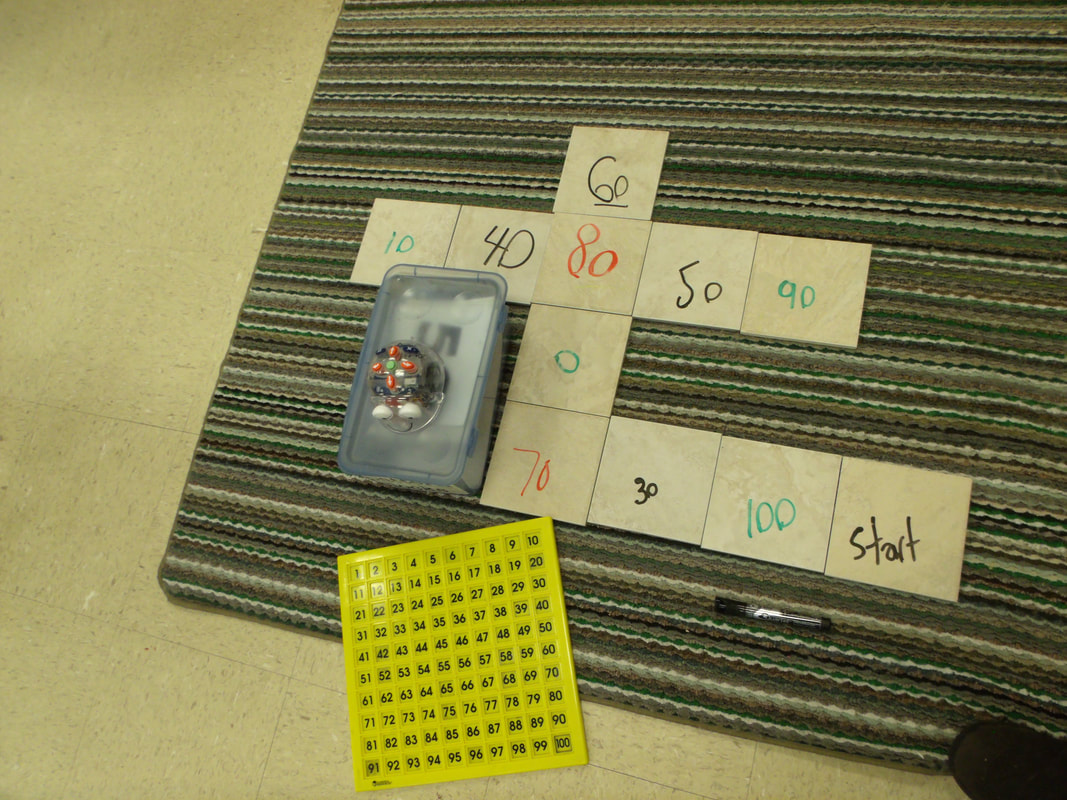
While we are talking about our BlueBots we use 15 cm ceramic tiles for paths. The locate Habitat for Humanity Re-Store is our source for tiles @ 10¢ and because they are ceramic students can write on them or draw on them to make their own paths and challenges.
In the photos below you will find a commercial product with rubber tiles and coding symbols big enough for Early Year students to move themselves around. A 100 carpet could also be used as an Un-plugged coding activity.
Finally, if you have one of these …
Any of you who have competed in the First Lego League competitions ([email protected]) are familiar with their 4’ X 8’ challenge mat. It is a Bristol board weight printed paper that can be rolled and transported easily. We use both sides of the mat. Even without the Lego contraptions (i.e., towers, buildings, ramps, etc.) in place our students make their own using Lego or Duplo or cardboard creations for the robots to negotiate paths around successfully. The blank back side of the mat is also used with these alterations. But because the one side is blank we use it to build our grid mazes with our PVC maze pieces as well.
Finally, when you want to make a path or maze right then and there, you CAN use anything …
During the past 18 months we have been trying out different mats, grids, and mazes for our students to run their robots (BlueBot, DASH, and MBot). Here are some of the options we have used and rejected and our final solutions.
We use Solo cups, large and small (shot glass size) to make pathways and mazes. They are easy to use for all ages and can be easily adjusted. Storage is quick and easy. The only difficulty we have found is that once taken apart and redone any coding needs debugging if the exact measurements for lengths and angles are not duplicated.
We use masking tape on our classroom and hallway floors to make paths. Again, they are easy to use. At first students tend to make them very complicated with lots of different size angles but after trying to “drive” the robot or code the robot through them the students understand the capabilities of the robot better and they make more reasonable paths or mazes. Cleanup is easy – just pull the tape up from the floor.
These two options are great and we highly recommend them. We also looked at the problem of how to build a path or maze that could be reconstructed again.
For paths and mazes that can be taken down and then put up again here is what we tried…
The first straight wall mazes were built with leftover cardboard from boxes. The height was 30 cm (12 inches) and bent every 30 cm if the piece was longer or joined with book-binding tape. This did give us the flexibility of different angles depending on how the cardboard was bent. However, the cardboard had a tendency to shift and a 45 ⁰ angle for one coding run often wasn’t 45 ⁰ the next run. Other problems were the cardboard would tip over easily. If we shored it up with cardboard cross pieces, those pieces jutted into the pathway and were difficult to move around. There were times when I questioned the effectiveness of the Bluetooth signal getting through to the middle of the maze but lack the deep understanding and knowledge of “Bluetoothing” to have proof. Cutting down the height of the maze walls to 15 cm seemed to help. In the end the two biggest problems of where and how to store all these maze wall parts and the fact that it was difficult for our younger students to set up and see the whole maze made us move on and try something else.
The next maze walls we tried were using foam core. A local dollar store had pieces the size of letter paper (9’ X 12”) and could be scored and snapped into pieces. The height was 5 cm and to make the cross walls, pieces were notched out. However this notching weakened the foam core pieces and when our students tried to build the maze the pieces broke apart at the notch.
So … here is what we now use successfully for mazes and grids!
We purchased PVC door jamb pieces. They are 7 feet long and cost around $7 (Canadian).
Since the piece is PVC there are no splinters and the cuts ends are smooth making it easy to lay them down one after another. Several pieces were cut at 45⁰ angles to make easy maze corners. The length for all pieces was 10 cm. Although this length was not suitable for our Bluebots who move 15 cm at a command it worked great with the DASH and Mbots. Also for students who created a maze on Scratch and then duplicated it to run robots, the standard unit of length made calculations and creations easy.
A trip to the local fabric store netted us several pieces of coloured vinyl. We made grids using masking tape or permanent markers. In one cases the students drew & coloured their story map locations right on the light grey vinyl. Vinyl that was lightweight was easy to move and store but wrinkled easily and once wrinkled made it difficult for the robots to move easily around. Heavy weight vinyl was difficult to roll up and store. Drawing smeared if we used anything but permanent markers.
So … here is what we now use successfully for mazes and grids!
We use clear vinyl. We use it mostly for our BlueBots. The size of the vinyl mat is small enough (150 cm X 150 cm) to make it easy to move and store. The weight is a medium gage so that it doesn’t wrinkle and when folded over does not leave fold marks. Permanent markers make grid marks every 15 cm. It is light enough for our students to lift up and add pictures underneath. It is sturdy enough to have a ceramic tile on a grid space as part of the challenge for BlueBot to go around.
While we are talking about our BlueBots we use 15 cm ceramic tiles for paths. The locate Habitat for Humanity Re-Store is our source for tiles @ 10¢ and because they are ceramic students can write on them or draw on them to make their own paths and challenges.
In the photos below you will find a commercial product with rubber tiles and coding symbols big enough for Early Year students to move themselves around. A 100 carpet could also be used as an Un-plugged coding activity.
Finally, if you have one of these …
Any of you who have competed in the First Lego League competitions ([email protected]) are familiar with their 4’ X 8’ challenge mat. It is a Bristol board weight printed paper that can be rolled and transported easily. We use both sides of the mat. Even without the Lego contraptions (i.e., towers, buildings, ramps, etc.) in place our students make their own using Lego or Duplo or cardboard creations for the robots to negotiate paths around successfully. The blank back side of the mat is also used with these alterations. But because the one side is blank we use it to build our grid mazes with our PVC maze pieces as well.
Finally, when you want to make a path or maze right then and there, you CAN use anything …
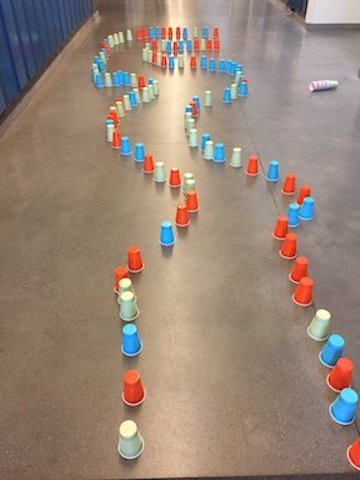
Plastic cups make a quick Path that can be adjusted easily. Before a path is made students estimate how many cups they will need to produce their path they first sketched out on paper. Readjustments of that estimate continue as the path is being built.
Classroom floor tile (30 cm square) become the unit of measurement.
DASH movement blocks can be adjusted by 10 cm increments.
DASH movement blocks can be adjusted by 10 cm increments.
Masking tape on a floor that lacks tiles can be tricky at first especially
with less than 90 degree angles.
Students soon learn to adjust their coding &/or their design.
with less than 90 degree angles.
Students soon learn to adjust their coding &/or their design.
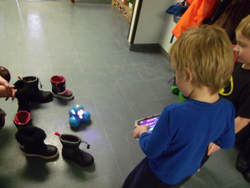
Students grabbed some boots and programmed DASH
to go in and around them.
to go in and around them.
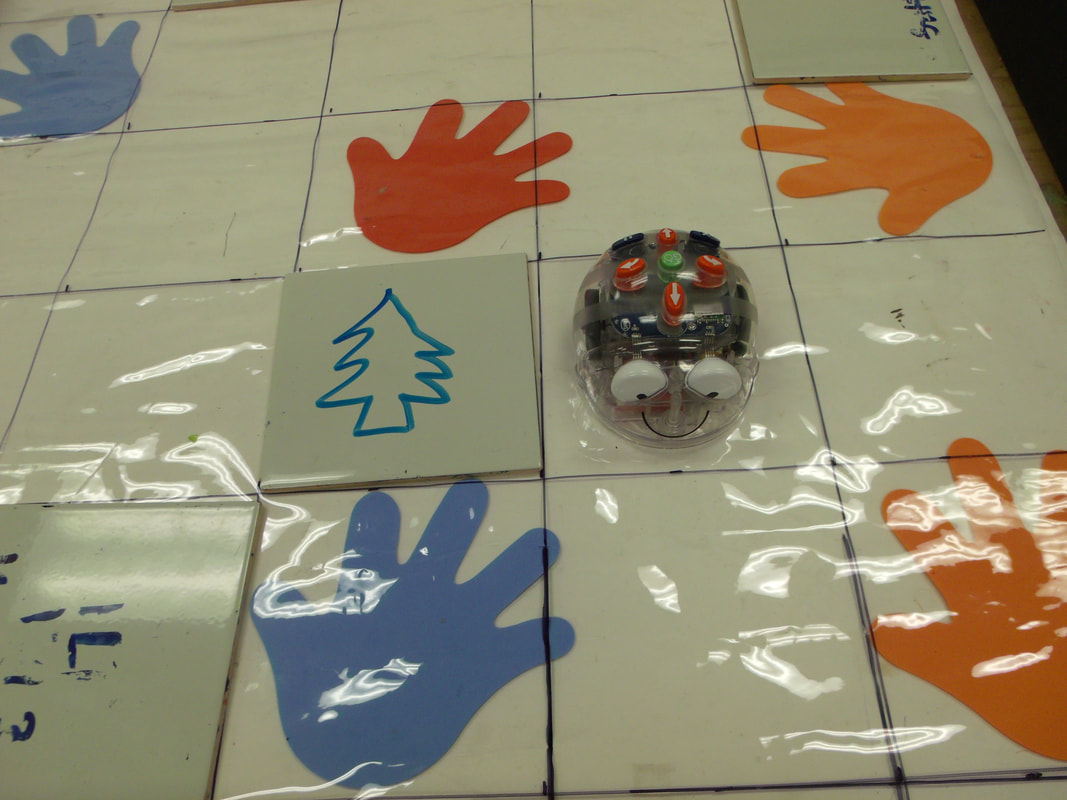
Clear Vinyl from fabric store, marked off in 15 cm grid. Tiles very cheap from Habitat for Humanity Re-Store. Bluebot coding to different colours of hands
and students count by 5's.
and students count by 5's.
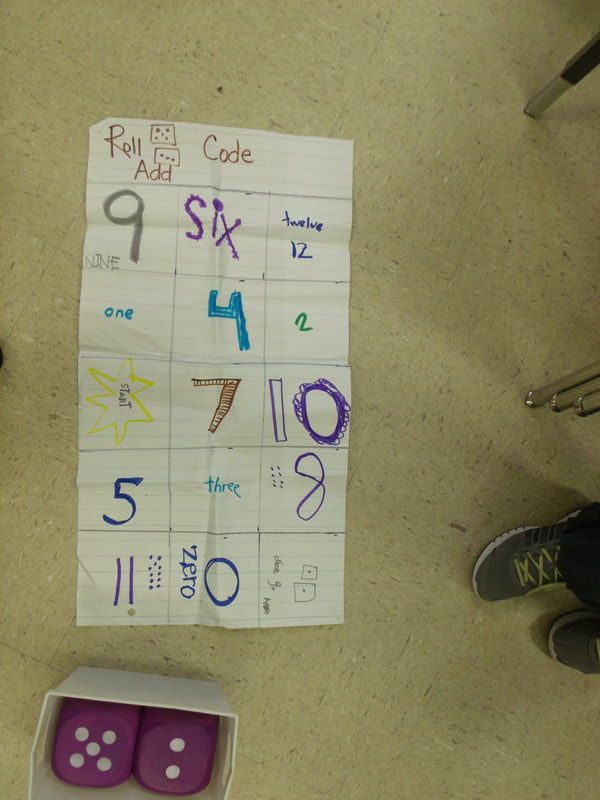
Students roll dice and add to find the sum, or subtract to find the difference. Then they code the BlueBot to travel to that location on the grid to earn the points. DASH robot has the same game only a larger
mat to fit the movement length. Same idea for a multiplication mat.
Notice students' design it and make the mat.
mat to fit the movement length. Same idea for a multiplication mat.
Notice students' design it and make the mat.
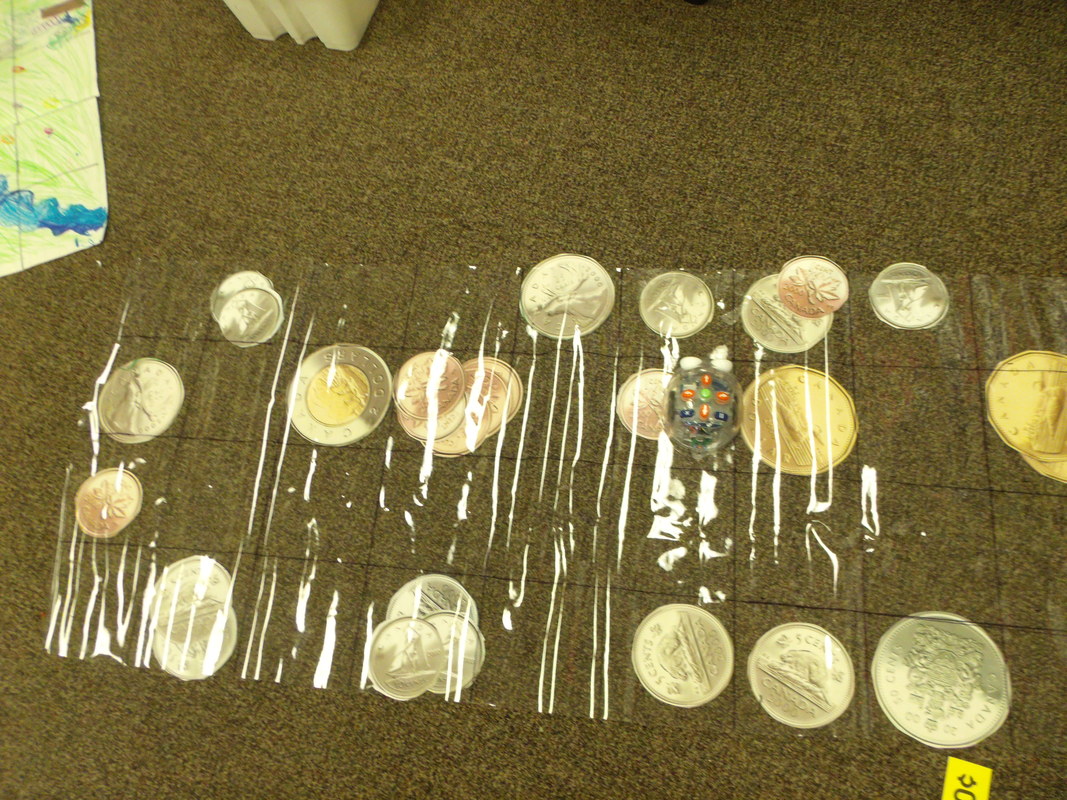
With the clear vinyl mat it is easy to change the items in the grid cells. The challenges can be adjusted to a wide range of curriculum expectations. For example: code to the quarter; code to find coins that add up to $1.00; code to find the MOST coins you can that will all add up to $1.00; and code the coins from the least in value to the greatest in value.
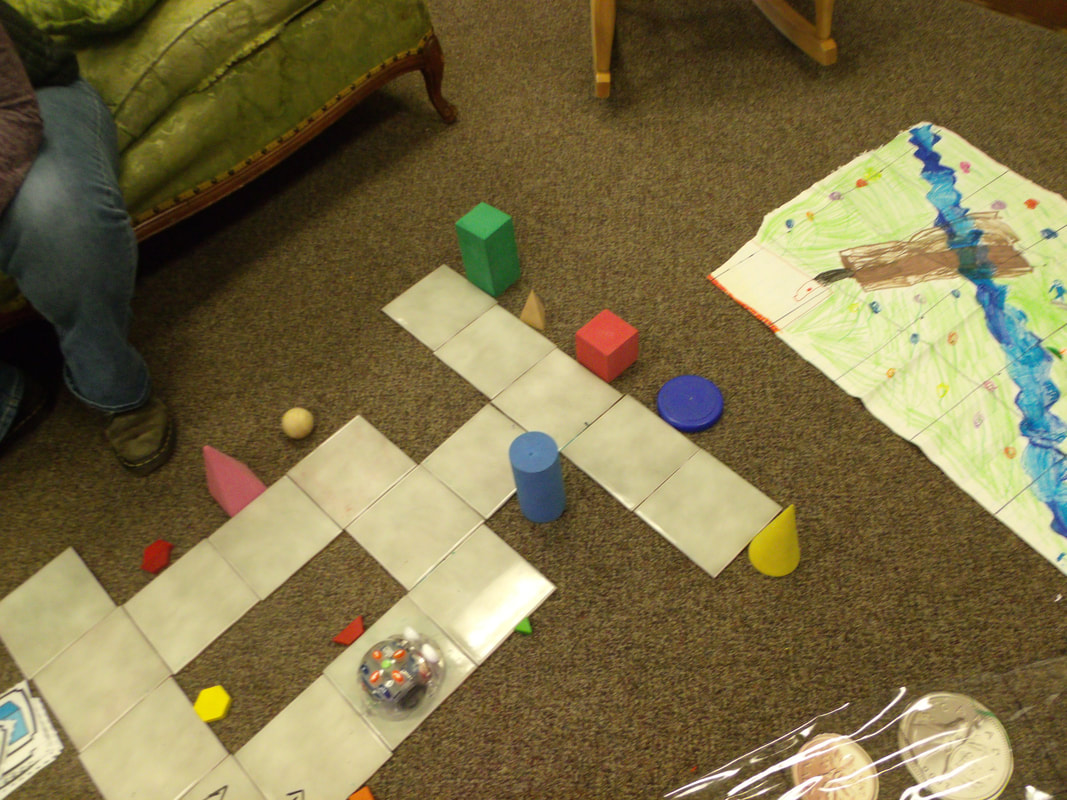
Using 15 cm square tile students code the Bot to find the rectangular prism
or the figure that has 6 sides.
Notice the students created a story map to retell a tale by coding the Bot
to travel, stop, retell a portion of the story, then travel, stop, & retell, and so on
(upper right hand corner of this photo).
or the figure that has 6 sides.
Notice the students created a story map to retell a tale by coding the Bot
to travel, stop, retell a portion of the story, then travel, stop, & retell, and so on
(upper right hand corner of this photo).
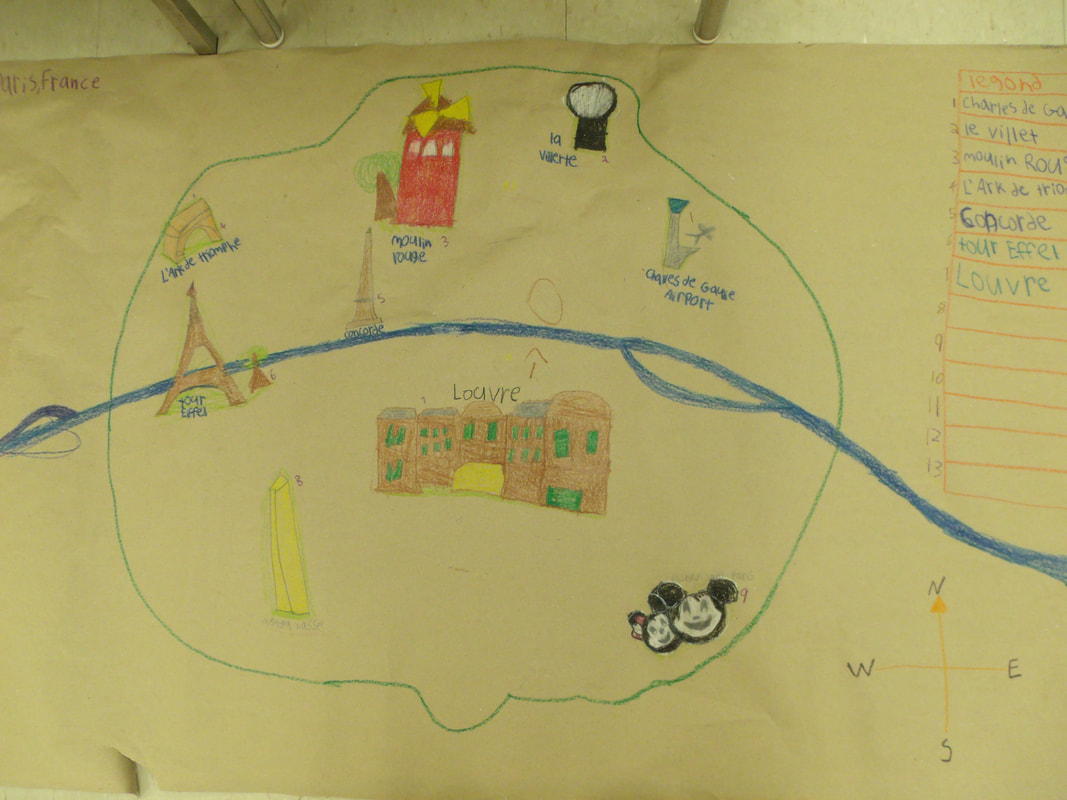
Coding in FSL? Oui! Students learned about the famous landmarks in Paris.
Some made these landmarks as a Maker Space activity.
Others made this map. Then they can program the Bot to travel to the landmarks.
The Bot stops at a landmark and the students share the information about it,
then the Bot moves on to the next landmark. (thanks Mme Wilson)
Some made these landmarks as a Maker Space activity.
Others made this map. Then they can program the Bot to travel to the landmarks.
The Bot stops at a landmark and the students share the information about it,
then the Bot moves on to the next landmark. (thanks Mme Wilson)
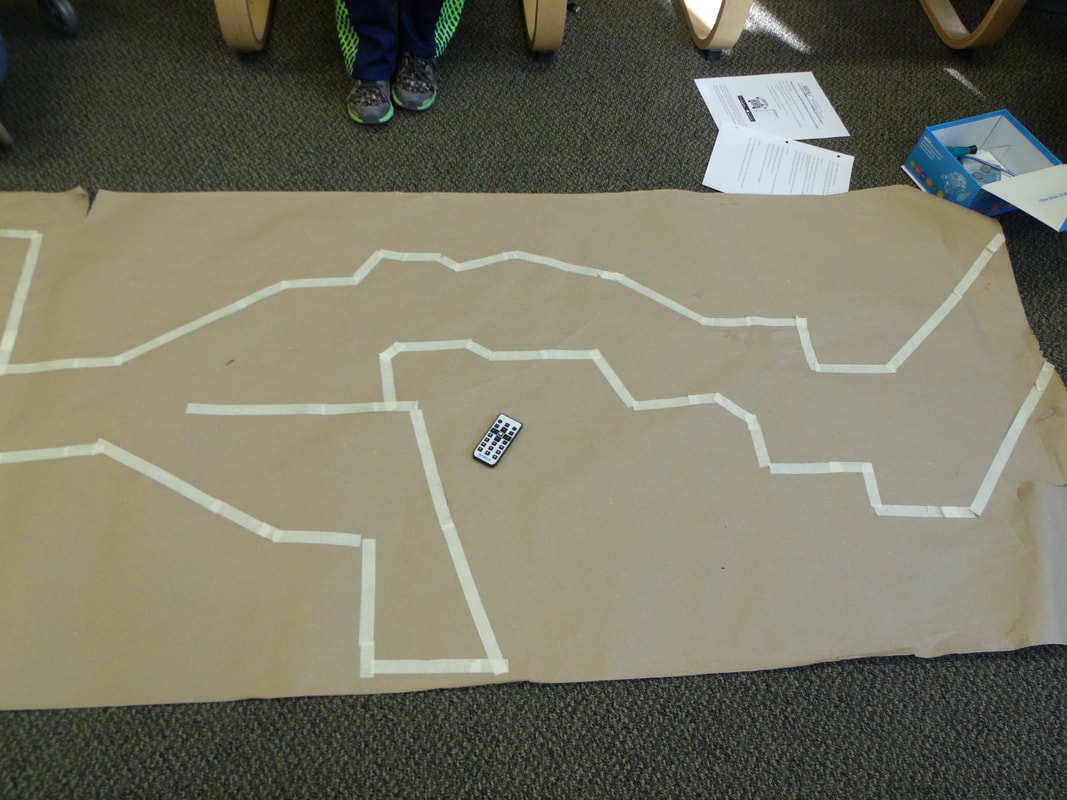
Here is a path designed by Intermediate students to use with Scratch and an MBot. The Mbot can be "driven" using the remote (on the mat)
or coded using Scratch due to its Bluetooth capabilities.
or coded using Scratch due to its Bluetooth capabilities.